Tuesday, January 31, 2012

Cannon: Part 2....

To All,

Thanks to Student Teacher I have been looking at the ends of the cannon and thinking, "a black dot on the end of this is really going to look crappy." So I have resigned myself to drilling out the ends.(Maybe some people should keep their comments to themselves.)

Anyway, here it is:
I used the 1/16" bit from my DREMEL set..

....and put it into my drill. I have found that I get a great result if I just set the drill on the bench and bring the cannon to it....


....once it is centered I drill it for roughly 5 seconds....

..and end up with a good result.
I will be painting these up tonight and posting tomorrow.
Here is where to order the cannon at Brigade Games:

Monday, January 30, 2012

Half-hour Boat: Part 2....

To All,

Part 2 of the Colonial River Gunboat:

I brought the pieces to the workbench. I peeled the blue tape from the bottom of the hull. The line between the red and grey was perfect.


Here is a shot of the hull. It actually looks pretty good.

I used black wash on the decking on the hull and on the top deck to bring out some detail on the boards:


I watered down some Antique White and washed the covering on the top deck. In this picture you can also see the black wash on the deck - these three steps took roughly 10 minutes.
Here is the Colonial River Boat put together. You can see the smoke stack here.


Not bad for around 30 minutes of work. Let me know what you think.....

Sunday, January 29, 2012

Half-hour Boat: Part 1


To all,

I have a Colonial River Gunboat that I want to use at Cold Wars but I have no time to paint it up. So I decided to see if I could get it respectable in less than a half an hour. The caveat here is that the 30 minuets is the amount of time I actually spent working on the model - this does not include the time it took the paint to dry between steps.

Here goes:

I primed all sections of the boat black - total spray time 6 minutes


Next I sprayed the bottom of the hull Army Painter Dragon Red - total spray time 1 minute.


There is a line going arount the bottom of the hull. I aligned blue painter's tape along it and took it back to the priming area - 4 minutes.


I then sprayed the hull and the "cabin" with a grey primer. I used primer because it has the matte finish I'm looking for and will cover in one coat. I held the can at a 45-degree angle.


The wheel house and deck are sprayed with white primer - again at an angle to keep some of the highlight.

The roof is sprayed Dragon Red and the smoke stack Ultramarine Blue (no picture).

Here are the pieces drying on the priming board.


It is going very quick so far - about 18 minutes of actual work.

Part 2 tomorrow......

Friday, January 27, 2012

Cannon.....

To All,

The - "duh, we have cannons" -  box arrived from Brigade Games. Fresh out of the box my first impression is that they are very, very nice!

The figure is a British Marine dog handler from the Gnomes at War line at Brigade Games. (He will be kicking some pirate ass at Cold Wars) I put him there for size comparison.  

There are four different sizes of cannon. The smaller one on the left has its own small carriage. The two in the middle have the same size carriage but the guns are of different size, and the large cannon on the right has a larger carriage that is sized for it.

If you look at the ruler on the right you can see that the large cannon is about 2 inches long!


In this shot you can see the different size cannon. I have my work cut out for me tonight!

Thursday, January 26, 2012

Ships: Progress....


To All,

Things done over the past two days in an attempt to press forward....
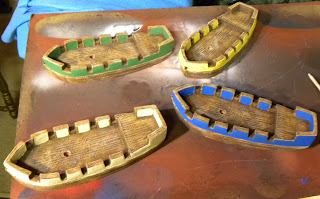
I added some color to the ships.....


....and cut out a test sail...

....and determined it looks pretty rough...


....so I took some advice from herzogbrian and sprayed them with ....
....Over a can....

....I'll let you know how it turns out tomorrow.

I also sent out the rest of the ships to get painted....

....and I'm happy to be rid of them.

Tuesday, January 24, 2012

Masts: Continued......


To All,

I need to get moving and hopefully have most of what I need done for the High Seas game done by Sunday night. Last night I made progress on the construction of the masts.

I went and got some dowels. Not all of them are for mast construction - the larger ones are going to be used for range sticks.

 These are the tools for the mast construction. Loctite Power Grab, the "Easy Cutter" by Midwest Products, and my little metal ruler. You can see on the table I have most of the masts constructed. The only thing I had to do was to add the part sticking out towards the back of the ship. (not very nautical)

The Easy Cutter is a great tool. The face of it has different angles right on it. Just line up the dowels and get pretty accurate angled cuts.


I had a hard time getting the flat-angled cut to stick to the round dowels so I had to put a in notch the mast in order to make them stick.


 Three lines cut into the dowel....

 ....the notch....

 ..perfect fit....

 ..filling it in with Loctite.


Loctite is a really great adhesive. Out of the tube it has the consistency of caulking - you can fill in spaces with it and smooth it out with a wet finger or paper towel. The nice thing about Loctite is that it begins to "set-up" within a couple of minutes, holding together the two things you are wanting to join rather quickly. I usually let it cure over night before I put any paint or primer on it. Once cured the hold is really strong.
These are the simple masts - I'm going to show you a different/fancy way to do it toward the end of the week but I am feeling the pressure to get this done so this is what I have.